Materials
Shipping pallets are great materials for DIY projects that can be easily sourced for free. Often, they can be found discarded behind buildings near dumpsters in good condition. By using these pallets, we are removing them from the waste stream and giving them a new function. When looking for pallets, look for an “HT” stamped on them. This indicates that the pallet is heat treated, making it more resistant to microorganisms and fungi, and increasing its longevity.
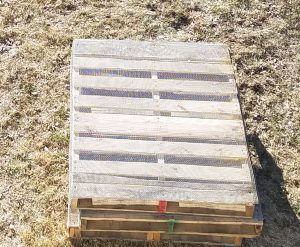
We also used a roll of wire mesh that we sourced from a community partner. Chicken wire would work as well. The purpose of the wire around the pallets is to help retain the compost within the structure, without closing off the air flow. An alternative to this method is to use wooden planks from deconstructed pallets to fill in the large gaps in the pallets.
Tools
- Pickaxe
- Shovel
- Hacksaw
- Drill & Screws / Staple Gun / Hammer & Nails
Design
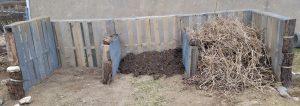
For this composter, we used 5 standard-sized pallets and 2 small, half-sized pallets to create 3 sections. The back is composed of 3 of the standard pallets, the sides are each 1 standard pallet, and the sections are separated by the small pallets. The idea behind this design is that as we flip the compost from one section to the next, the compost gets turned and aerated. The first section is the least decomposed, the second more so, and by the time it’s turned into the third section, it will be nutrient-rich soil. In this case, we built the structure on an incline, so that we can easily turn the compost downhill. Compost needs to be turned so that it can break down aerobically. To learn more about this, check out our tutorial on composting.
Building
This project goes a lot faster and smoother with more hands. We had about 5 people and finished in about 3 hours. Get your friends & neighbors involved and you can make this a fun afternoon project.
Once your team is assembled, it’s a good idea to lay out the pallets in the location where you want the composter. This is a good time to think about any adjustments you may need to make.
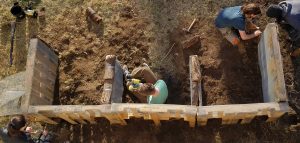
The next step is to dig approximately 6 inch deep trenches into the soil where each of the pallets will stand, so that they will be secured in the ground. Using a pickaxe is a pretty quick way to dig these trenches. Be sure to keep the excavated soil around; you’ll need it later.

While the trenches are dug, other members of the team can work on wrapping the wire mesh around the pallets. Using a hacksaw, cut sections of wire long enough to wrap around the pallets, leaving some excess so that you can fold in the sharp edges for safety. We found that using a drill and screws or a staple gun works well for securing the wire to the pallets. A hammer & nails would work too if you have those around.
Once all of the pallets are wrapped, it’s time to place them in their respective trenches and fill the edges with soil. We used a shovel to push the soil back, and then we packed it down by stomping around the pallet. Make sure all the pallets feel secure in the ground, and then you can start adding compost!